The key feature of BeeToo interface is maximum of simplicity and functionality, which is come true due to scenario based control of the subject of automation and extracting to the last (third) inner level interface rarely demanded elements, such as full keys remote controls.
Ready to use home automation system interface
Design and logic structure of control UI elements let seamlessly add new scenarios or remove old one and not to break usability and beauty of interface.
Interface available for resolution 1024x768 iPad 2, iPad mini. Another one will come soon.
Interface project contains:
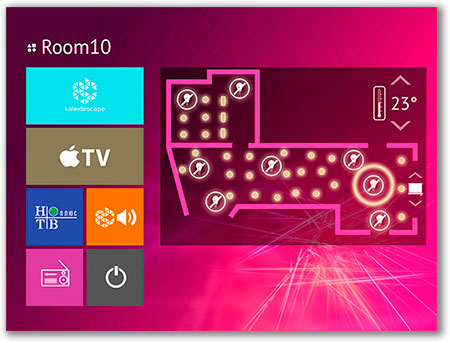
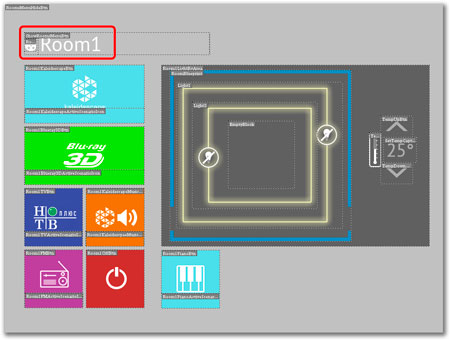
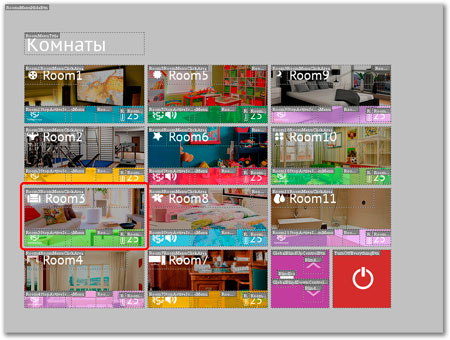
Introducing one universal logic to control each room. There are buttons to start scenarios and room plan on the main popup of the room (for example, room BeeToo_room1_main_popup). Also, on the top of the room's plan placed buttons to control light groups (even light presets) and climate (fancoil, air conditioning, etc.)
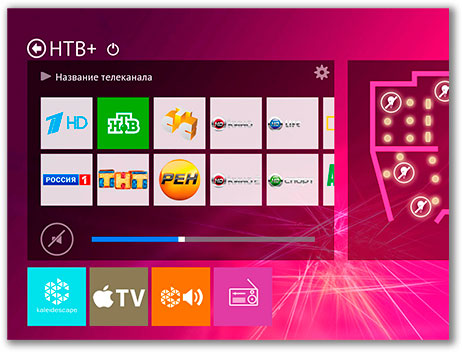
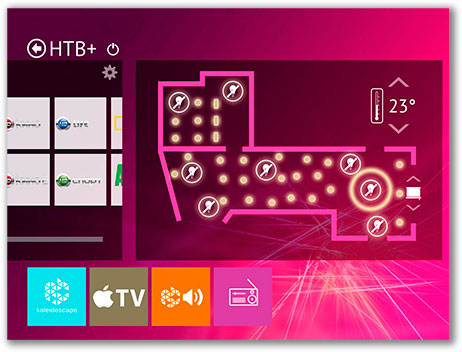
After scenarios starts, interface changes and now user inside of interface to control started scenario (page BeeToo_room1_tv_popup, BeeToo_room1_radio_popup, etc.), Inside scenario page we see room's plan again, with light and climate controls (the same, as on the main room's page). And of course there are main controls for current scenario. For example, for 'Watching TV scenarios' there are buttons to select the channel. In the bottom of page there are shortcut buttons to start another scenario just in one touch. User able to navigate inside scenario page by familiar gestures of left and right swipe.
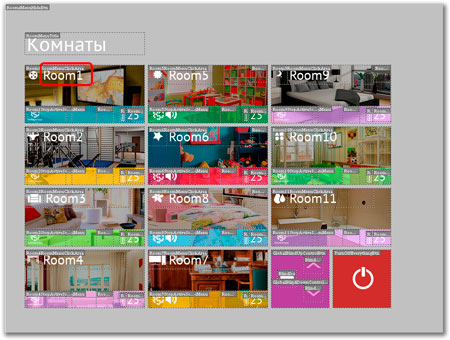
If one wish to go to the all rooms overview menu, one should to to press and hold over the title of current room.
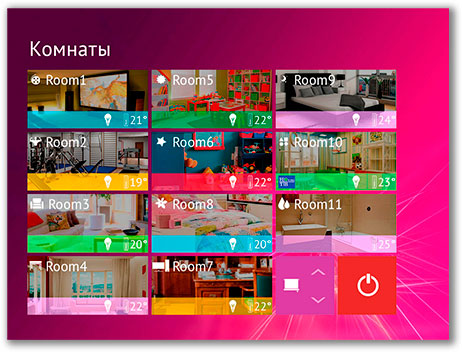
In the rooms menu user able to see are there playing scenarios, and where exactly they are played. There are light indicators fo each room. If it's shown, light in the room is on. To turn it off, one should hold over the light indicator. The same way one able to stop any scenario. By holding the button "Shutdown all", you able to stop all scenario and turn off light everywhere. Also, there is one button to control blinds in all room in one touch.
To change current room, one should press the button of appropriate room.
For additional presentation and interface's work example, please, look at the video:
How to change a set of rooms
Attention! There are a lot of invisible (transparent) UI items in the graphical part of project. Such UI items often overlays, they lay on the top of each other. The integrity of design, high usability: all of that is come true by means of UI items overlaying.
For example, there is active scenario indicator Room1ActiveScenarioRoomMenu, placed on the page BeeToo_rooms_menu_popup. Indicator is placed perfectly in UI layout. It also clickable, user able to stop specific scenario. The size of indicator is too small, to use it as a button. That's why on the top of indicator there is transparent button Room1StopActiveScenarioBtn. It handles user's click events. The button is easily accessible on the screen of mobile device, cause it is big enough (button's size is equals to parent color block).
Keep in mind "hidden" components, when you working with UI elements (add, edit, delete). Position of UI items relative to each other should remain unchanged. Do not forget to change properties and names of invisible items together with common UI items.
How to rename "room1" into "Cinema hall"
To change name of room, one should change the value of property Text for proper UI items: from
Attention!
Be careful, do not miss UI items, while you renaming them.
One should rename exactly all UI items together.
If one of them will be skipped, names may clash during the
How to change background image for room1
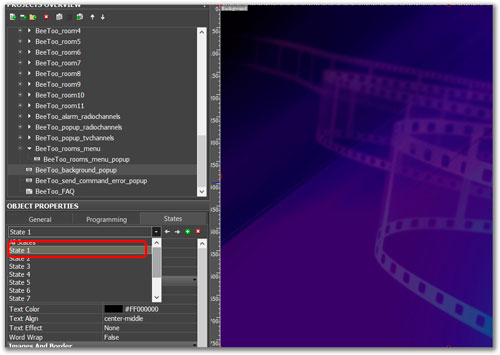
Background image for specific room may be changed in UI item Background on the page BeeToo_background_popup. UI item Background has a lot of states (State 1, State 2, State 3, etc.), each one determines image in it's property Image. This property should be changed, if one intend to change background image.
How to define connection between room and State number of Background item? Please, take a look at BeeToo API page: api.html/showBackground
How to delete room "room2"
To delete one specific room, for example
Delete directory with pages (from the tab
Inside directories there are numerous pages. All of them will be deleted, when one will delete directories. If directories will be deleted, in fact specified pages going to be removed:

How to create new room "Room12"
To create new room
Let's describe each step.
Create tokens
One should create tokens, the same as exists for each room:
Room's pages
One should create pages for room
Scripting modules
One should create scripting modules, implementing logic dealing with room
One is able to copy all scripting modules for another one room (for example
function room3GoBackToMainPage(popup) {

    showMainPopup('room3', 'BeeToo_room3_main_popup', false, false, popup);
}function room12GoBackToMainPage(popup) {
showMainPopup('room12', 'BeeToo_room12_main_popup', false, false, popup);
}var startRoom3TVScenario = function (){
stopRoom3ScenarioForced();
IR.SetVariable("Tokens.Room3TVScenarioActive", 1);
IR.SetVariable("Tokens.Room3ActiveScenario", true);
IR.SetVariable("Tokens.Room3ActiveScenarioNumber", 2);
};var startRoom12TVScenario = function (){
stopRoom12ScenarioForced();
IR.SetVariable("Tokens.Room12TVScenarioActive", 1);
IR.SetVariable("Tokens.Room12ActiveScenario", true);
IR.SetVariable("Tokens.Room12ActiveScenarioNumber", 2);
};BeeToo_rooms_menu_popup
UI items to display status of the room
Controlling equipment
Project have to control smart home equipment to be full-feature, end-user interface to control whole automation system. One able to to divide equipment control into two categories:
Commands sequence or "key" commands. They usually addressed to logic controller (if one is used in your automation project). Example of commands, belongs to this category:
Simple equipment commands:
"Key" commands
Key commands are special in the way and moments of time, they are being sent. For example, project sends commands concerning with start/stop of scenario when user navigating between scenarios interfaces. In common, there are no special buttons to send such type of commands. For example, when user enters specific page for scenario BeeToo_room1_blueray3d_sc (from the main page BeeToo_room1_main_popup) a call of procedure startRoom1BLUERAY3DScenario takes place. All routines implementing preparation of equipment (to turn it on, configure it and so on) should be placed inside startRoom1BLUERAY3DScenario
In the same manner, inside procedure stopRoom1ScenarioForced should be placed iRidium script code, that is switchs off all equipment in the room. And the code that is turning off all equipment, except one that is starting a lot of time, should be placed inside routine stopRoom1Scenario. Thereby, there is a method for user to turn off scenario and start another one without to wait a long time while equipment will start for the second time. On the other hand, if scenario was stopped with help of stopRoom1Scenario and during some period (for example 2 minutes) there are no activity in room, all room's equipment should be turned off.
"Simple" commands
Simple commands binding to buttons and other UI items in common way, described in section
The same way commands are binds to the buttons of virtualized remote controls:
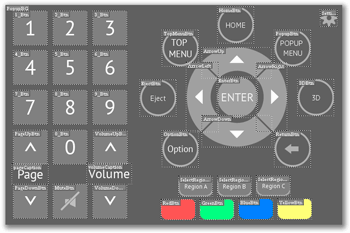
There are few buttons and other controls that are placed in the same manner on each of the scenario pages.
These buttons handle same events and calls same procedures.
To prevent copy-paste strategy, we binds commands to these controls in another way.
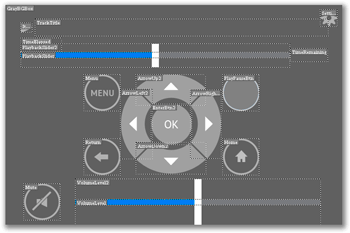
For example, button
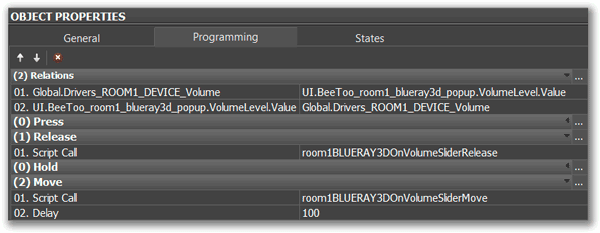
Similarly, for volume "slider" (that is exists almost on every scenario page), binds two routines
for two events handling (to be more precise, let it be scenario